Installing the Groove Widget on Your Website
If you haven't yet created a widget, follow these steps:
Go to Settings → Widgets.
Select Create new widget in the top right corner.
Installing an Existing Widget
Once you have an existing widget, follow these steps to install it on your web page:
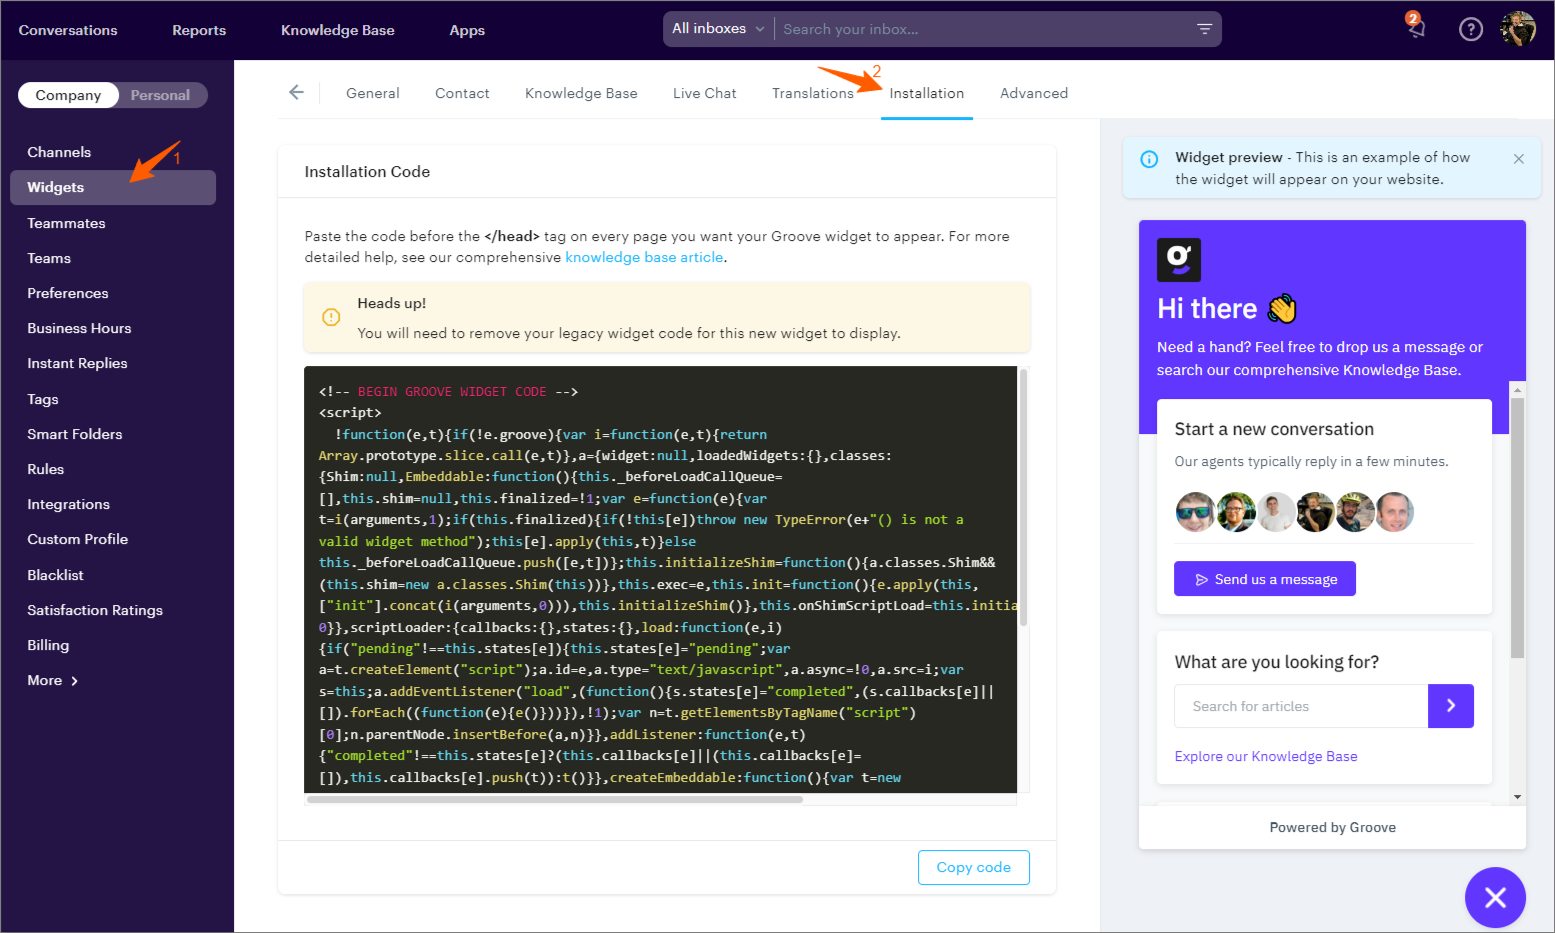
Go to Settings → Widgets.
Click the pencil icon on the widget you’d like to install.
Navigate to Installation.
Copy the snippet from your widget’s settings page.
Paste the snippet into the HTML of your website.
The exact method to do this depends on the type of website you're using:
Static website: Paste the snippet before the closingtag on every webpage where you want the Groove Widget to appear.
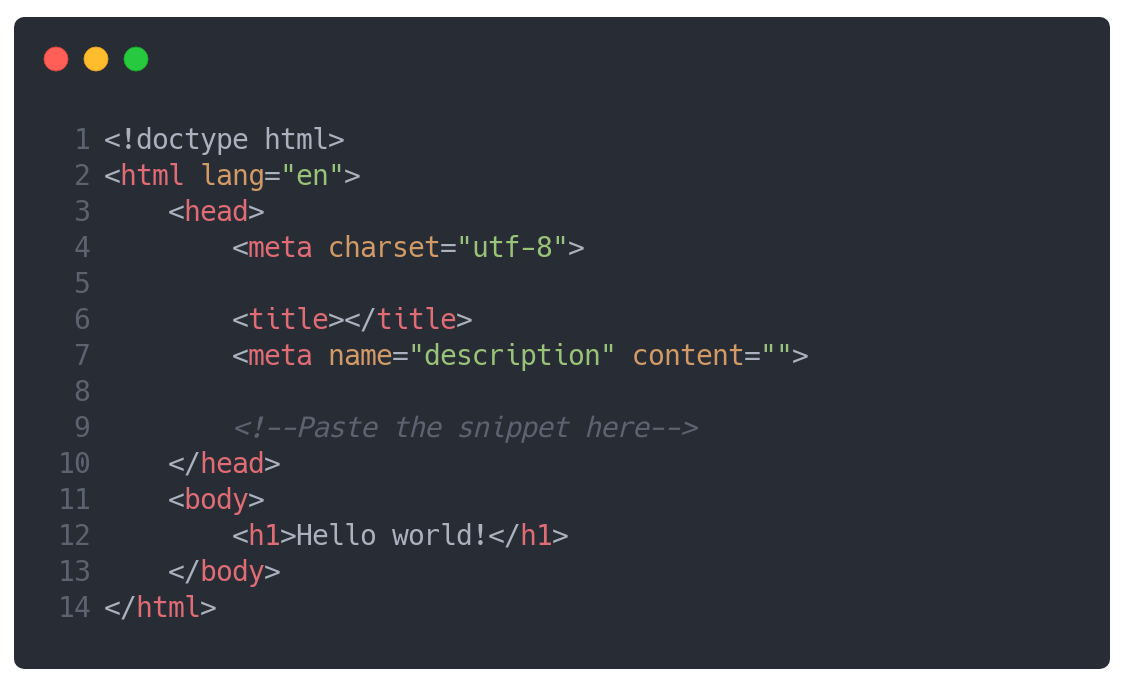
Dynamic website: Paste the snippet into its own include file and link the file in your page so that the snippet appears before the closingtag on every webpage where you want the Groove Widget to appear.
Installing Multiple Widgets
By default, only one Groove widget can be loaded on a web page (per URL). However, you can install multiple widgets and conditionally load one depending on your criteria. Knowledge of JavaScript is essential for this process.
To conditionally load a widget, follow these steps:
Copy the snippet from your widget's settings page.
Paste the snippet into the HTML of your website.
Wrap the inner contents of the
<script>tag in the snippet with a condition. This ensures that your Groove widget only loads if the condition passes.
Example: Load a different widget depending on the value of a Session Storage key loggedInUser. If the loggedInUser value is 'truthy', widget 1 will load; otherwise, widget 2 will load.
JavaScript<-- BEGIN GROOVE WIDGET CODE -->
<script>
// Load widget 1 if user is logged in (loggedInUser == true)
if (sessionStorage.getItem("loggedInUser")) {
!function(e,t){if(!e.groove){var i=function(e,t){return Array.prototype.slice.call(e,t)},a={widget:null,loadedWidgets:{},classes:{Shim:null,Embeddable:function(){this._beforeLoadCallQueue=[],this.shim=null,this.finalized=!1;var e=function(e){var t=i(arguments,1);if(this.finalized){if(!this[e])throw new TypeError(e+"() is not a valid widget method");this[e].apply(this,t)}else this._beforeLoadCallQueue.push([e,t])};this.initializeShim=function(){a.classes.Shim&&(this.shim=new a.classes.Shim(this))},this.exec=e,this.init=function(){e.apply(this,["init"].concat(i(arguments,0))),this.initializeShim()},this.onShimScriptLoad=this.initializeShim.bind(this),this.onload=void 0}},scriptLoader:{callbacks:{},states:{},load:function(e,i){if("pending"!==this.states[e]){this.states[e]="pending";var a=t.createElement("script");a.id=e,a.type="text/javascript",a.async=!0,a.src=i;var s=this;a.addEventListener("load",(function(){s.states[e]="completed",(s.callbacks[e]||[]).forEach((function(e){e()}))}),!1);var n=t.getElementsByTagName("script")[0];n.parentNode.insertBefore(a,n)}},addListener:function(e,t){"completed"!==this.states[e]?(this.callbacks[e]||(this.callbacks[e]=[]),this.callbacks[e].push(t)):t()}},createEmbeddable:function(){var t=new a.classes.Embeddable;return e.Proxy?new Proxy(t,{get:function(e,t){return e instanceof a.classes.Embeddable?Object.prototype.hasOwnProperty.call(e,t)||"onload"===t?e[t]:function(){e.exec.apply(e,[t].concat(i(arguments,0)))}:e[t]}}):t},createWidget:function(){var e=a.createEmbeddable();return a.scriptLoader.load("groove-script","https://11111111-1111-1111-1111-111111111111.widget.cluster.groovehq.com/api/loader"),a.scriptLoader.addListener("groove-iframe-shim-loader",e.onShimScriptLoad),e}};e.groove=a}}(window,document);
window.groove.widget = window.groove.createWidget();
window.groove.widget.init('11111111-1111-1111-1111-111111111111', {});
}
</script>
<!-- END GROOVE WIDGET CODE -->
<!-- BEGIN GROOVE WIDGET CODE -->
<script>
// Load widget 2 if user is not logged in (loggedInUser == false)
if (!sessionStorage.getItem("loggedInUser")) {
!function(e,t){if(!e.groove){var i=function(e,t){return Array.prototype.slice.call(e,t)},a={widget:null,loadedWidgets:{},classes:{Shim:null,Embeddable:function(){this._beforeLoadCallQueue=[],this.shim=null,this.finalized=!1;var e=function(e){var t=i(arguments,1);if(this.finalized){if(!this[e])throw new TypeError(e+"() is not a valid widget method");this[e].apply(this,t)}else this._beforeLoadCallQueue.push([e,t])};this.initializeShim=function(){a.classes.Shim&&(this.shim=new a.classes.Shim(this))},this.exec=e,this.init=function(){e.apply(this,["init"].concat(i(arguments,0))),this.initializeShim()},this.onShimScriptLoad=this.initializeShim.bind(this),this.onload=void 0}},scriptLoader:{callbacks:{},states:{},load:function(e,i){if("pending"!==this.states[e]){this.states[e]="pending";var a=t.createElement("script");a.id=e,a.type="text/javascript",a.async=!0,a.src=i;var s=this;a.addEventListener("load",(function(){s.states[e]="completed",(s.callbacks[e]||[]).forEach((function(e){e()}))}),!1);var n=t.getElementsByTagName("script")[0];n.parentNode.insertBefore(a,n)}},addListener:function(e,t){"completed"!==this.states[e]?(this.callbacks[e]||(this.callbacks[e]=[]),this.callbacks[e].push(t)):t()}},createEmbeddable:function(){var t=new a.classes.Embeddable;return e.Proxy?new Proxy(t,{get:function(e,t){return e instanceof a.classes.Embeddable?Object.prototype.hasOwnProperty.call(e,t)||"onload"===t?e[t]:function(){e.exec.apply(e,[t].concat(i(arguments,0)))}:e[t]}}):t},createWidget:function(){var e=a.createEmbeddable();return a.scriptLoader.load("groove-script","https://22222222-2222-2222-2222-222222222222.widget.cluster.groovehq.com/api/loader"),a.scriptLoader.addListener("groove-iframe-shim-loader",e.onShimScriptLoad),e}};e.groove=a}}(window,document);
window.groove.widget = window.groove.createWidget();
window.groove.widget.init('22222222-2222-2222-2222-222222222222', {});
}
</script>
<!-- END GROOVE WIDGET CODE -->Adding the Widget to a React Website
Here's a quick guide for adding the widget to a React website. The process is similar to the general website installation, but with a few adjustments. You can add the widget to your index.html or dynamically using JavaScript's createElement() method. For more details, visit the MDN Documentation.
How To Delay The Widget From Popping Up
To delay the widget from popping up, you can use the following code:
JavaScript<!-- BEGIN GROOVE WIDGET CODE -->
<script>
setTimeout(function() {
!function(e,t){if(!e.groove){var i=function(e,t){return Array.prototype.slice.call(e,t)},a={widget:null,loadedWidgets:{},classes:{Shim:null,Embeddable:function(){this._beforeLoadCallQueue=[],this.shim=null,this.finalized=!1;var e=function(e){var t=i(arguments,1);if(this.finalized){if(!this[e])throw new TypeError(e+"() is not a valid widget method");this[e].apply(this,t)}else this._beforeLoadCallQueue.push([e,t])};this.initializeShim=function(){a.classes.Shim&&(this.shim=new a.classes.Shim(this))},this.exec=e,this.init=function(){e.apply(this,["init"].concat(i(arguments,0))),this.initializeShim()},this.onShimScriptLoad=this.initializeShim.bind(this),this.onload=void 0}},scriptLoader:{callbacks:{},states:{},load:function(e,i){if("pending"!==this.states[e]){this.states[e]="pending";var a=t.createElement("script");a.id=e,a.type="text/javascript",a.async=!0,a.src=i;var s=this;a.addEventListener("load",(function(){s.states[e]="completed",(s.callbacks[e]||[]).forEach((function(e){e()}))}),!1);var n=t.getElementsByTagName("script")[0];n.parentNode.insertBefore(a,n)}},addListener:function(e,t){"completed"!==this.states[e]?(this.callbacks[e]||(this.callbacks[e]=[]),this.callbacks[e].push(t)):t()}},createEmbeddable:function(){var t=new a.classes.Embeddable;return e.Proxy?new Proxy(t,{get:function(e,t){return e instanceof a.classes.Embeddable?Object.prototype.hasOwnProperty.call(e,t)||"onload"===t?e[t]:function(){e.exec.apply(e,[t].concat(i(arguments,0)))}:e[t]}}):t},createWidget:function(){var e=a.createEmbeddable();return a.scriptLoader.load("groove-script","https://ADD THE CUSTOMER WIDGET IN HERE.widget.cluster.groovehq.com/api/loader"),a.scriptLoader.addListener("groove-iframe-shim-loader",e.onShimScriptLoad),e}};e.groove=a}}(window,document);
window.groove.widget = window.groove.createWidget();
window.groove.widget.init('ADD THE CUSTOMER WIDGET IN HERE', {});
}, 10 * 1000); // 10-second delay
</script>
<!-- END GROOVE WIDGET CODE -->
You can update the number of seconds you'd like to delay it by in that last line.
How To Open The Widget On An Element (Clickable Button)
To open the widget when clicking a button you'll need to this code to your site's <head> tag:
JavaScriptdocument.addEventListener("DOMContentLoaded", function(event) {
    var link = document.getElementById("open-widget")
    if (link) {
      link.addEventListener("click", function(e) {
        groove.widget.open()
      }, false)
    }
});
The above code currently has the ID as "open-widget".
You would then add this ID to the <a href> and then any link with that ID would trigger the widget to open.
(side note: one can't use id="widget-link" because Groove already uses that to open the contact form).
How To Install The Widget On A Next.js Website
You would just need to add it to the pages/_document.tsx like so:
JavaScript<Script
            id="groove-widget"
            strategy="beforeInteractive"
            dangerouslySetInnerHTML={{
              __html: `<em><strong>WIDGET_CODE_HERE</strong></em>`
            }}
          />